gluten free

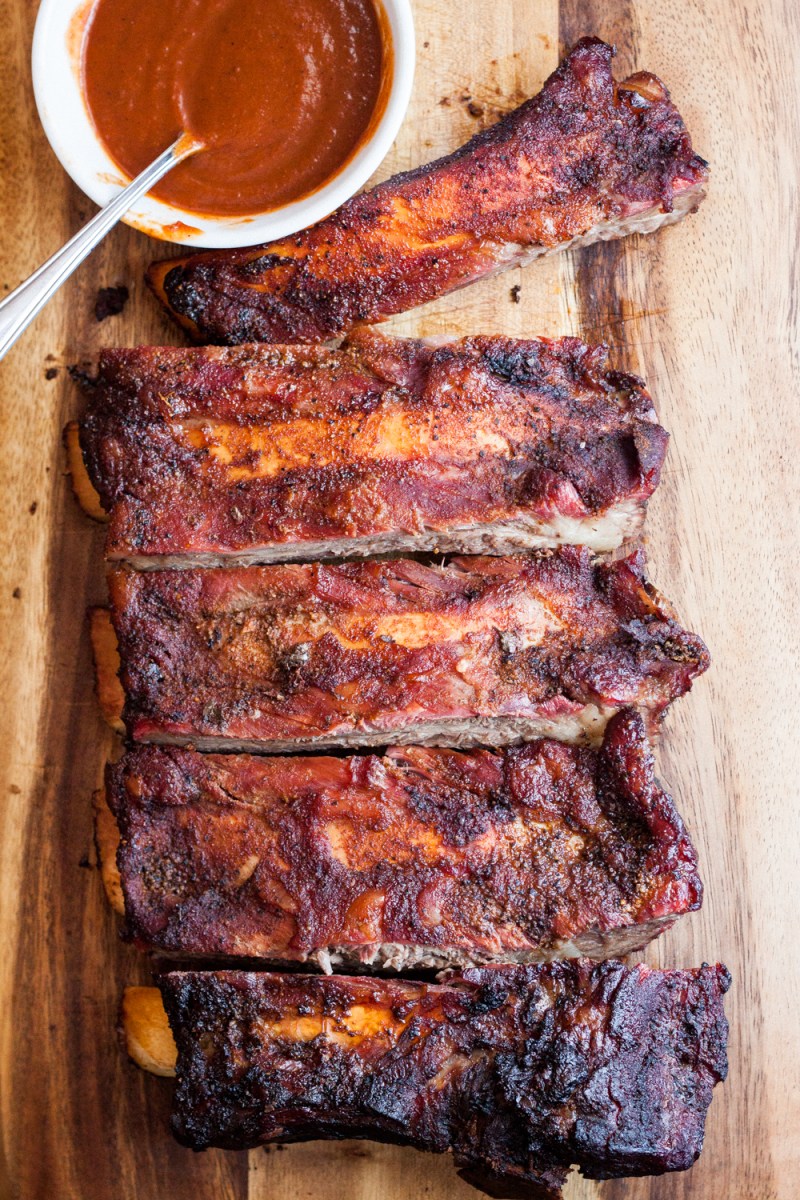
US Wellness Meats recently asked me to make a recipe for their beef back ribs, and I was happy to oblige (note: don’t ever turn down ribs). Little did I know, I was in for a surprise: this package, which included four racks of ribs, weighed in at SIXTEEN POUNDS of beefy goodness. I immediately knew that I had to call in for backup to give these monsters the attention they deserved.

Enter my friend Jeremy from SeaDog BBQ. SeaDog BBQ is a locally-based Kansas City Barbeque Society competition team, and they’ve done pretty well here in Maryland against some very talented teams. Not only did he come up with an awesome sugar-free barbecue rub recipe to accompany these beef ribs, he brought over his own smoker! While his smoker is from a small, locally-produced source, he did mention that the Weber Smokey Mountain is one of the best introductory smokers that are commercially available. If you don’t own a smoker, never fear – I added tips on how to replicate this recipe using a grill.

Okay, enough with the background, on to the ribs! For this recipe we cooked two of the racks, totaling eight pounds. We opted for a dry, sauceless cooking method, typical of Memphis-style barbecue, with an hour’s braise in the middle to speed up the cooking process and to keep the ribs juicy and full of beefy flavor.

Read Full Article

NOTE: An updated version of this recipe appears in my cookbook, The Ancestral Table.

While I usually eat a combination of meat (homemade jerky, smoked salmon, sardines, or uncured deli meat) and fruit (berries, banana) for breakfast during the workweek, on weekends I tend to gravitate towards your typical eggs/bacon breakfasts. Unfortunately, this guy gets tired of eggs fairly quickly, even after trying every just about every egg preparation under the sun. Then last week a friend turned me onto the dish you see above, huevos haminados.

This egg dish is popular in Jewish communities in the Middle East and the Mediterranean, and served at Passover Seders (a ritual feast that marks the beginning of Passover). The dish’s Latin-based name might throw you off, but that’s a reflection of its origin in Medieval Spain. There are several variations online, which include boiling the eggs in onion skins and coffee, or simmering in a crock pot for seven hours. I decided to go with an even easier approach – you just throw the eggs in an oven for five hours.

While the egg shells stay mostly white, the egg whites become a rich brown color and the eggs develop a nutty, roasted taste. There’s even a hint of meatiness in there that’s hard to describe. Either way, it’s a dead-simple dish that is worth a try!

Read Full Article

NOTE: An updated version of this recipe appears in my cookbook, The Ancestral Table.

There are four main benefits to making your own homemade stock:

1. It saves you money, especially if you use leftover chicken parts. As you’ll see in this recipe, even buying chicken parts specifically for stock is still cheaper than buying commercially-available stock.
2. You get to control the taste of the broth, especially how much salt goes into it – which in my case is NONE. I prefer to add salt to my dishes as I cook them, without having to worry about how salty my broth is going to make my dish.
3. You can make it as concentrated as you’d like, which helps you save valuable freezer/fridge space.
4. You have control over where the chicken comes from, and how it was processed, by purchasing your birds/parts from a local farm or from online vendors.

For this recipe, I used chicken parts from U.S. Wellness Meats; specifically, chicken backs and necks. I used these parts because they have lots of bones, which house a lot of nutrients that are imparted into the broth. U.S. Wellness Meats were out of chicken feet at the time of my order, so I got some locally. These are great because they are full of bones and collagen, which create a rich, flavorful, and gelatinous broth. Other options for chicken parts are leftover chicken carcasses (store them in the freezer after roasting a chicken, until you have a few ready to go), or whole stewing hens (older chickens that are too tough to eat using quick-cooking methods).

Read Full Article

NOTE: An updated version of this recipe appears in my cookbook, The Ancestral Table.

US Wellness Meats recently sent me a package of their grass-fed bison stew meat, and I jumped on the opportunity to make a traditional hearty stew. Rather than settle on the all-too-common crockpot stew (nothing against those), I opted to make this stew the traditional way – browned meat, sautéed onions, simmering wine-and-stock broth, and incrementally-added ingredients – to make sure the final product was both decadent and perfectly-crafted. That might sound like a lot of work, but it really isn’t – this is a dish that can easily be completed in a few hours.

Although the American bison is often referred to as a buffalo, it is only a distant relative of the true buffalo (like the Asian water buffalo). Its closest relative is the European bison, also known as a wisent. Its meat is usually leaner than beef, high in iron, and sweeter-tasting. Because of its leanness, I find that it’s best served in slow-cooked meals like this stew, as hamburgers, or as a grilled meat (like shish-kabobs) served medium-rare.

If you don’t have bison meat on hand, never fear – this stew tastes just as great with beef or lamb stew meat!

Read Full Article

NOTE: An updated version of this recipe appears in my cookbook, The Ancestral Table.

Growing up with the Standard American Diet (otherwise known as SAD), I became accustomed to certain tastes. One of my favorite random meals was Salisbury steak TV dinners – something about that squishy meat and savory broth really hit the spot for me. So I decided to re-create this dish, but instead of squishy, breadcrumb-filled beef, I used some of the best ground beef I’ve ever tasted – US Wellness Meats’ 75% lean ground beef (by the way, their 25lb. bulk pack is on sale until 10PM CST on Saturday, March 3rd!). It tasted just as good as it looks.

Interestingly enough, Salisbury steak was first developed in the late 19th century by Dr. J H Salisbury as a low-carb, weight-loss dish. Similar dishes are popular worldwide, especially in Japan (hanbāgu steak) and Russian (котлета).

Read Full Article

NOTE: An updated version of this recipe appears in my cookbook, The Ancestral Table.

We make ribs at the house pretty often, so much so that we seem to always be buying BBQ sauce. Although I like the taste of the all-natural (and unfortunately-named) Bone Suckin’ Sauce, I’ve been wanting to make my own sauce for a while.

Read Full Article

One of the more unique elements of my December giveaway was that I promised to make the winner a gluten-free variation of any traditional dish they wanted. The winner, Mandy from The Yard, requested a gluten-free chicken lasagna, and I was definitely up for the challenge. Little did I know how much of a challenge it would be!

From the outset, I wanted to make a creamy, spinach-based lasagna like you’d find in Northern Italy, since it would go really well with chicken. The trouble came with the rest of the ingredients – how much cream do I use? What cheese will work best? And how long do I cook it? After several unsuccessful attempts, I feel like a chicken lasagna expert in what NOT to do. For example, don’t use ricotta cheese, because it makes the dish too rich. Also, you don’t need as much cream as you’d think, and you need to thicken the cream with hard cheese to keep it from bubbling over while baking. You also need to soak the no-boil noodles in hot water before cooking (despite the manufacturer warning you AGAINST doing that) in order to get the perfect consistency without overcooking your spinach. Lastly, mozzarella cheese works best on a top layer, creating a pizza-like upper crust.

After a good amount of trial and error, I’m proud to say that I’ve got a unique and delicious chicken lasagna recipe that is just about the tastiest thing I’ve ever made. Fair warning: this is a dairy-intensive dish, with butter, cream, and four different types of cheese!

Read Full Article

Edit: the giveaway is now closed! Congratulations to Maia Low who is the big winner!

You may have seen my recent recipes featuring some delicious meats from US Wellness Meats (including my liver and caramelized onions and honey and citrus glazed ham recipes). You may also have been salivating from the awesome looking meat and dreamed of making some of your own. Luckily for you, I am teaming up with US Wellness Meats to make your dreams a reality: we’re giving away a $100 gift certificate to their site!

And while a free $100 worth of meat sounds great, I have an even better proposal. How about you treat this $100 as a “grass-fed buffer” – in other words, calculate what you pay for the mediocre (and possibly toxic) meat that you can find at your local supermarket, and then use the $100 certificate to offset the cost of buying this delicious, healthy grass-fed beef. For example, let’s say you regularly pay $4/lb for ground beef at your supermarket. US Wellness Meats’ awesome 75/25 ground beef currently costs $6.45/lb. This means that if you win the giveaway, you could buy THIRTY EIGHT POUNDS of grass-fed ground beef for the same price as the same amount of conventional ground beef, and have money to spare even after paying their reasonable $7.50 handling fee (shipping on their site is free)! Just an idea – you can spend the $100 how you’d like, but that’s what I would do!

Here’s how to enter the giveaway (first one is required, second is optional):

1. Subscribe to the US Wellness Meats newsletter and leave a comment on this post letting me know you did it.
2. “Like” The Domestic Man facebook page and leave a comment on this post letting me know you did it.

If you do both options, I’ll give you two entries into the giveaway! You can tell me that you did both options in one comment instead of two. The giveaway ends midnight Saturday, February 11th, and I will select a winner using a random number generator sometime thereafter. Good luck!

Fine print: Giveaway for US residents only – US Wellness Meats is not able to ship internationally because of customs issues.

Ham seems like a simple hunk of meat. All you have to do is buy a cured, pre-sliced ham and warm it up in the oven. Unfortunately, while this is the easiest (and most common) way to get some ham in your belly, it’s not the healthiest option. Your everyday pre-cooked ham is loaded with sugar and nitrates.

I’ve been meaning to tackle an uncured ham for a while, so imagine my delight when US Wellness Meats asked me to write up a recipe for their petite ham. This smoked ham is both sugar and nitrate free, using compassionate certified pork. Its size is also perfect for our family of three – 2.5 lbs of porcine goodness. There was plenty for us to eat, and a good amount of leftovers to boot. For those of you using a cured and/or a spiral-cut ham, don’t worry – this recipe works just fine for them as well.

Read Full Article

This may fall under the no-brainer category, but I thought I would explain how we bake our sweet potatoes here at the house. It’s one of our simplest recipes, and the only thing it needs is about 45 minutes of cooking time to ensure you get that perfect potato. Additionally, we like to take five seconds out of our busy day and add a little cinnamon to our potatoes, which gives just a twinge of complexity to the taste.

Here’s a couple neat facts about sweet potatoes. Sweet potatoes originated in Central/South America. Papua New Guinea eats the most sweet potatoes per capita, with 500kg per person annually. North Carolina supplies most of the sweet potatoes we find in US markets. They’re only distant cousins to the white potato, despite sharing the same name. They’re also pretty distantly related to yams (which originated in Africa), even though here in the US we often (incorrectly) label our sweet potatoes as “yams”.

Read Full Article